Introduction
This project was one of my earliest UX projects, but it took some pivoting to get there. In a couple of posts, I intend to go through the history of this project, what went wrong, (or at least not as intended), what I learned, what I’d do differently, and maybe what I’m doing next.
This is “Part 2” so check out my previous post to get a better understanding of what happened.
Also, this post ended up being a lot longer than what I expected. There was a lot to explain, unpack, and introspect upon.
Recap
After weeks of dreaming and designing our all-in-one speaker/music production box concept, I stalled in the engineering and prototyping phase. My plan was to make a simple engineering prototype for each feature using electronic tools like a raspberry pi computer and various breakout circuit boards.
Without the knowledge, the patience to learn some more advanced (by my standards) programming, or existing models of prototypes to “borrow” from, this aspect of the project began to feel like fighting windmills.
Without a way to make this thing “real”, I got pretty discouraged with moving forward.

What do I do with this stuff?
Re-focus
As I stated in my last post, there was one thing I could get to work. That was the MIDI controller board and buttons that I intended to be used as a prototype for the speaker’s control pad.
These pads were intended to be used as buttons to control various operations on the speaker, as well as a way to play notes on the speaker’s built in synthesizers and drum machines. These built in instruments were envisioned as a way for musicians to make loops to jam along to.
I decided these had to be MIDI compliant.
I figured that if this device had to sync with other instruments, the pads used to make background beats for loops should also be able to output MIDI to play other instruments such as a synthesizers and drum machines.
My thinking was as simple as “these make music notes, therefore they should use MIDI”.
The Controller Board
At the time, the LIVID Brain Jr. was the best option for an affordable single-board micro controller, specifically for MIDI. There was no coding necessary to set something up that would immediately start sending MIDI notes and signals out over USB.
At the time, LIVID had an online editor for the board’s configuration, as well as an abundance of parts intended for users to build their own controllers.
Most importantly the controller was less than $50 at the time. (Good luck finding one now).

Holding an LED lit arcade button attached to the LIVID Brain Jr. MIDI Controller board
Just a little side project ;)
After connecting a button to the controller, plugging it in to my mac, firing up Ableton, and using that button to trigger a sample, I had finally made progress. I had something that actually made (or triggered) some sounds (even though some other people did 99.99% of the work).
I thought if the electronics side could be that easy, I should use some of my ID skills and make my own “real” MIDI controller. Ya know, just for fun.

16 Arcade Button grid in Solidworks

Rounding some corners and adding some branding

Construction
“The Button Box” was designed with a two piece enclosure. The arcade buttons simply snapped in to the top half, and the LIVID board mounted with some screws to the bottom half. Molding or 3D printing can be very expensive for parts this size, but luckily, my dad’s work had a 3D printer that rarely got any use, and I don’t think anyone questioned a box being printed at a box company.
I connected the arcade buttons via soldered jumper cables straight in to the header ports of the LIVID Board. The inside was a spaghetti mess of wires, as I didn’t understand the concept of wiring buttons in series instead of in parallel.
Before putting the buttons in, I did a little neon paint splatter on the enclosure with some cheap craft paint.

cosmic bowling / laser tag arena
So I just built a MIDI Fighter with less functionality. It couldn’t help me become Shawn Wasabi, but I could use it to trigger some drum kits or sample racks in Ableton. I was proud of my little creation.
It also looks like I may have inspired someone to build something better.
Variations
It wasn’t too long before I was designing variations with different control layouts and different combinations of buttons, knobs, and faders.

16 knobs instead of buttons

“Piano” key layout with some knobs for synth controls and two more buttons for switching octaves
Layout for massive oversized arcade buttons

4 Buttons, 4 knobs, 4 faders
The LIVID Brain Jr. board limited my potential creations to some combination of 16 buttons and 16 knobs or faders (buttons are “digital” inputs and knobs are “analog” inputs).
The next design I actually built was intended to give me a way to DJ in Ableton Live with a crossfader to fade between tracks, some knobs to control a digital EQ, and a big, funny-looking jog wheel in the center to control global tempo. The jog wheel and fader handles were also 3D printed. I found the knobs for the potentiometers in a bin at a local reclamation store.


Unable to learn from my experience making the button box, I made the enclosure shorter (therefore less internal volume), and once again, didn’t wire anything in series, meaning I had a terrible amount of jumper cables and no room for them. It took a while to fit the enclosure together with out continually shorting out all the inputs (buttons triggering on their own, knobs turning on their own, etc.).
Once my new device was complete, and the insides had settled a bit, I used it to make things like a mix of my improvised electronic tracks.
I also used it to mix some of my beats a couple years later.

Off the Shelf Parts
All of my designs had used the same arcade buttons, knobs, and faders. These type of off-the-shelf electronic components are referred to as “panel-mount electronics”. They are typically standardized and companies producing different products may all source from the same manufacturer.
If you turn up the timer on a toaster oven, adjust the speed on a sewing machine, or adjust the feedback on a delay module within a modular synthesizer, you maybe be interacting with the same exact same potentiometer.
Although this can vary a little depending on the type and manufacturer, arcade buttons only require the correct diameter hole and wall thickness and they can either snap in or mount with a threaded collar from the other side of the panel.

Famous buttons produced by Japanese company Sanwa
Rotary potentiometers (AKA “Knobs”) only need the correct diameter hole and perhaps an indent for the washer and nut that mounts them to the panel. Slide potentiometers (AKA “Faders”) just need a slot for the “wiper” (the thing you slide up and down) and some small diameter holes for screws to mount the fader to your panel.

a beautiful wikihow illustration
These standard dimensions allowed me to reuse the same cutout outlines for respective components and simply drop them on the grid.
(This explanation has been simplified a bit from the actual techniques and subsequent jargon of SolidWorks, the program in which I designed the controller enclosures at the time).
Thinking About Mass Production
Although I was having a lot of fun building these controllers, the construction techniques and production methods were costly, and ironically enough, not good for customization. I started thinking about how people could use some sort of system to design their own controllers.

I played with the idea of proprietary “building blocks”. However, Geoff took the “modular” prompt more directly and sketched something that looked a bit more like some small, modular synthesizer cases. This also accommodated the use of the same off-the-shelf, panel mount components I had been using for my own controllers.

Some small modular synth cases for reference.
The previous controller enclosures were only two pieces. The top half included all the cutouts for the buttons, knobs, or faders. That piece was about 90% of the actual plastic needed to print the entire controller.
The plastic box and the circuit boards were consistent no matter the “design” of the control panel. So, the obvious solution to increase modularity and customization was to separate the panel for the electronics from the rest of the enclosure.

With this new architecture, enclosure designs could remain consistent, while the control panel designs could be swapped out. Enclosure cases could be 3D printed or potentially injection molded while panels could be quickly laser cut. This also opened up the opportunity to try different colors and materials for the control panel as well.

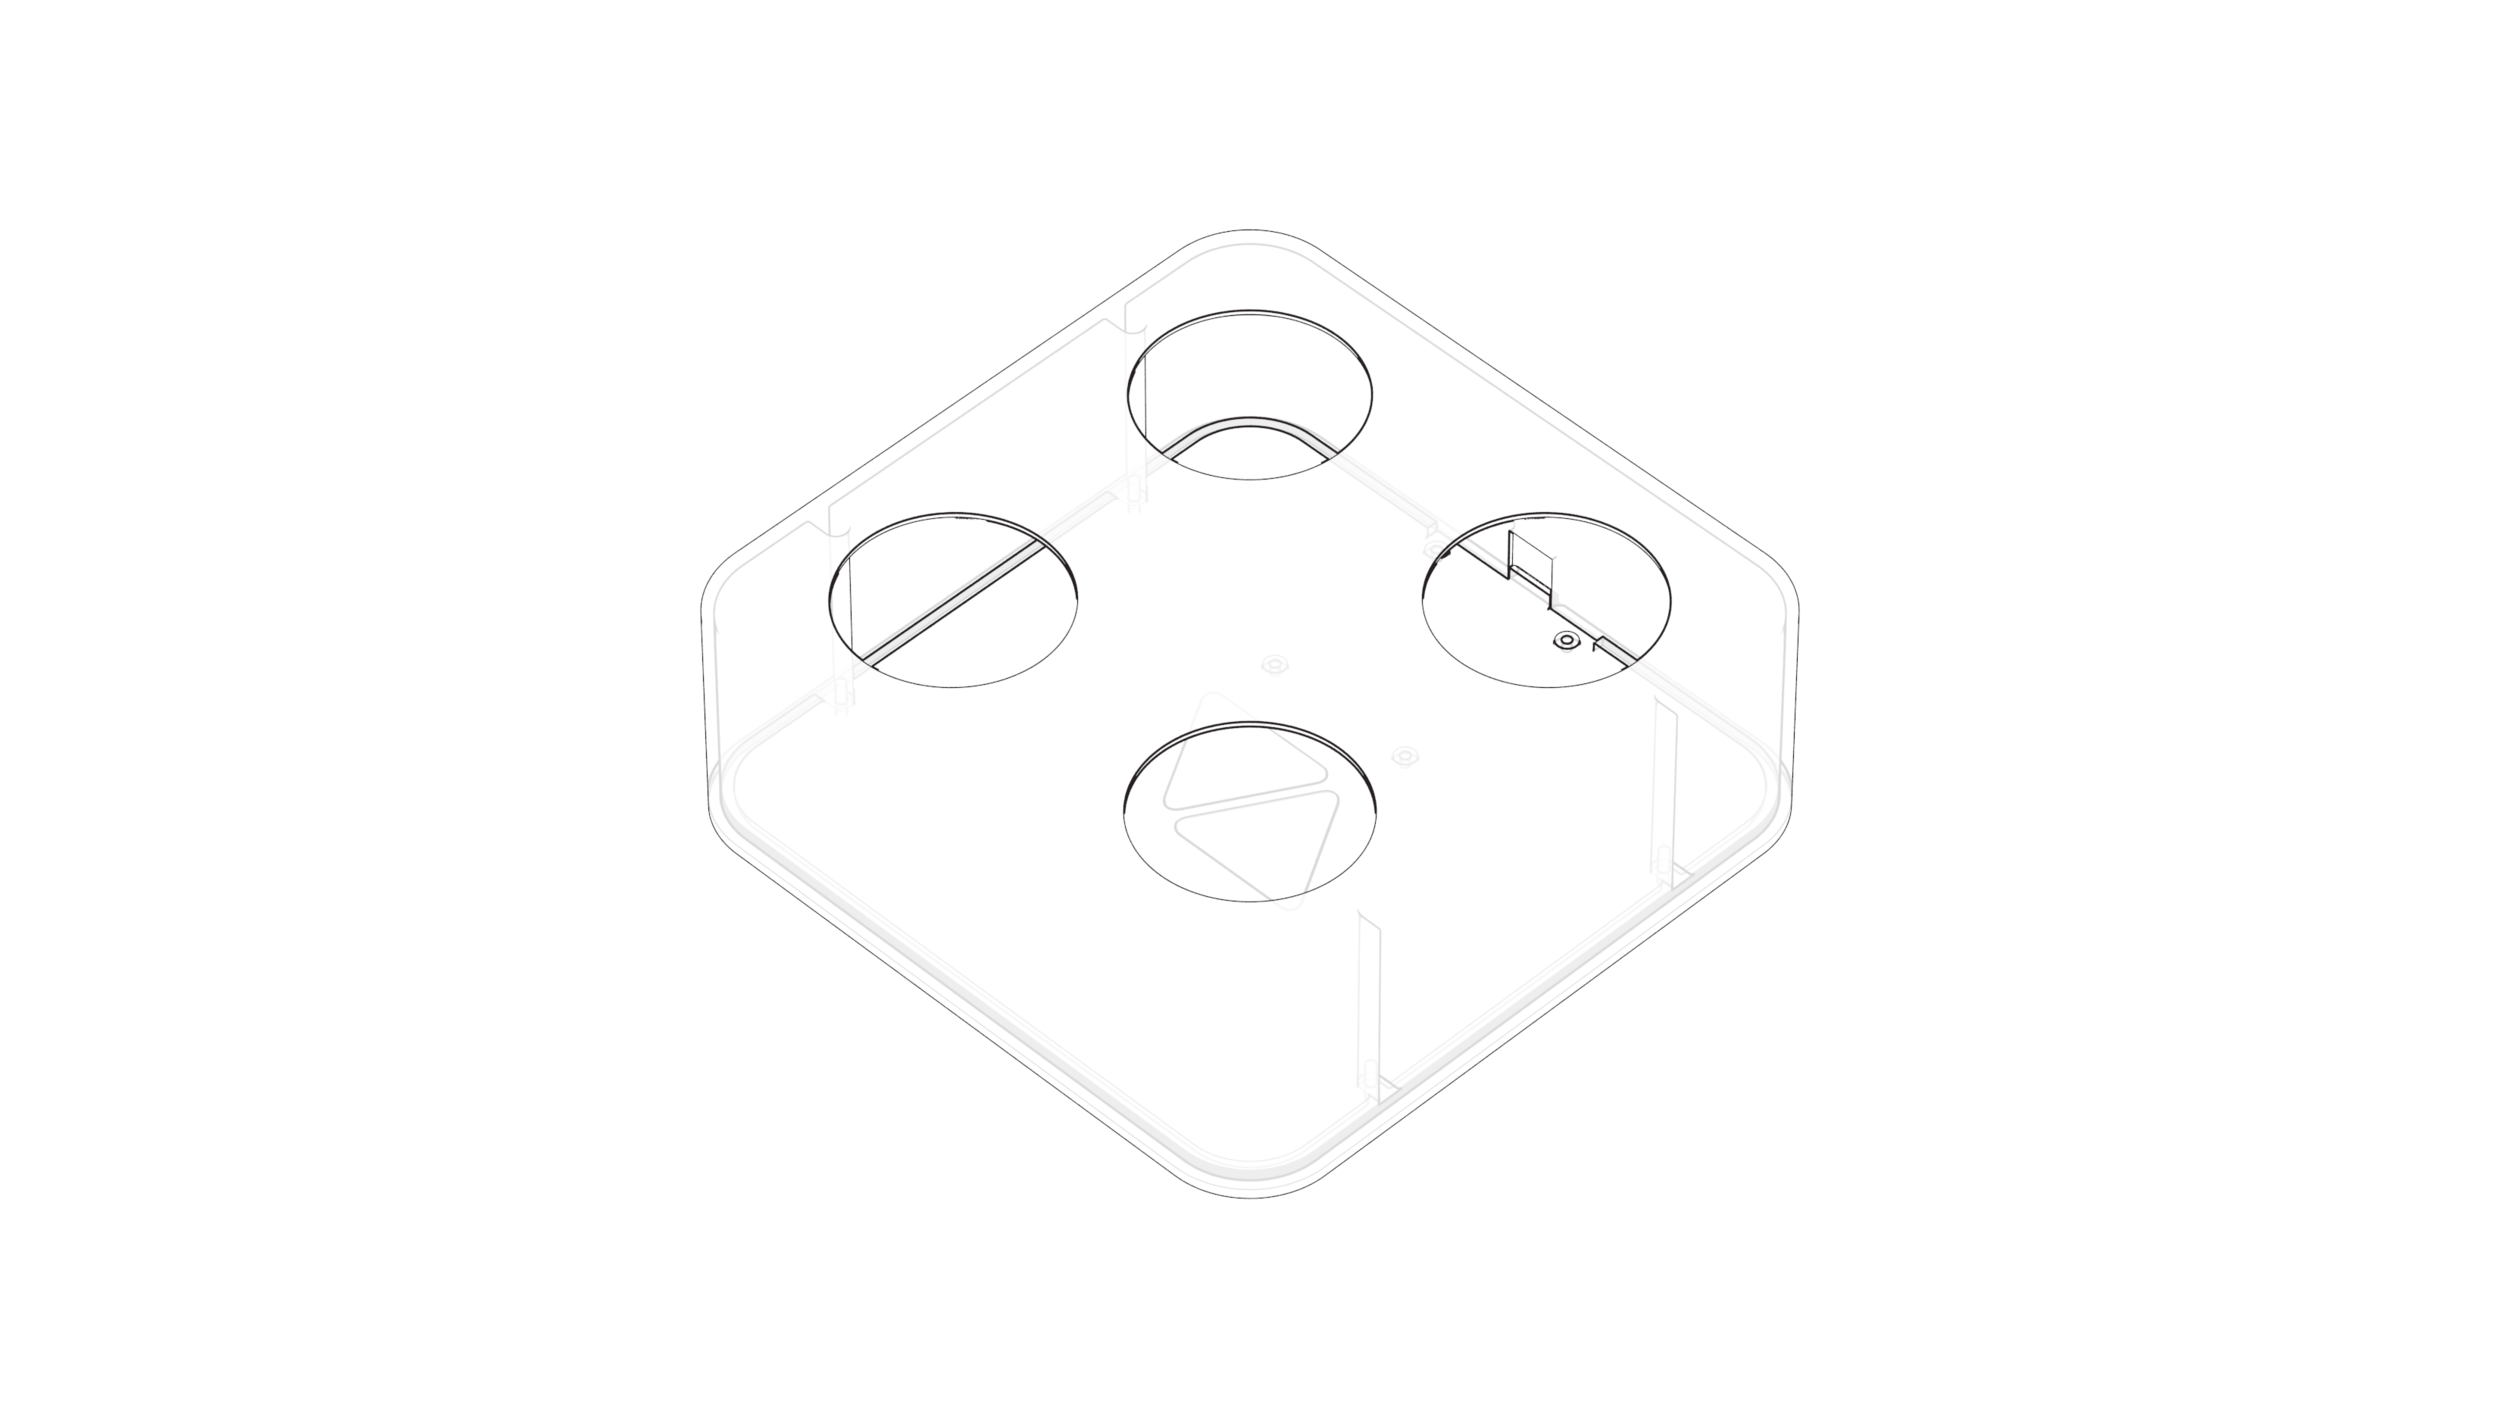
Exploded view of updated controller enclosure design

A bigger enclosure and panel that could accommodate using the full 16 button / 16 knob capacity of the circuit board
Flirting with Manufacturing
At this point the controller had just enough real-world engineering consideration that prices for materials and parts could be calculated to produce a price estimate per controller for retail consumption.
The cost of the following was estimated:
injection molding of the enclosure parts
wholesale electronic components
laser cut polycarbonate control panels
circuit boards
jumper cables for connecting components
packaging
In order to remain profitable and sell 1000 units of each type, the small controller kit would be priced at $170, while the larger kit would sell for $270.

For some perspective, this Korg nanoKONTROL MIDI controller has
9 rotary knobs
9 faders
18 function buttons
6 buttons for “transport controls” (play, stop, record, etc.)
A “Scene” option that allows the user to pick 4 different modes or presets, which essentially expands the number of controls fourfold.
These things were selling brand new for $40 around the same time that I was calculating price points.
Nevertheless, I believed that our price point was fair for a custom controller, as the only one in the same vein as our’s was an un-funded kickstarter project with a much higher cost per unit.
The Beginnings of UX
This updated hardware design allowed me to work out an idea that we had started to kick around since the original Button Box:
Allow the community to design their own controllers

The image above demonstrates one of the first times I attempted user interface design for a web application.
The idea was simple. Pick a box, drag and drop components on to the grid on the controller, and we would print an enclosure and send you the components, and you would put it together yourself.


This idea was whimsically sub-branded as “Arizona Instruments”. We had a logo and everything. This name and logo didn’t focus test well amongst friends so we ended up ditching it later.
I will go more in depth on the user experience side at a later date, in Part 3.

Hindsight
In this section I will share some thoughts on lessons learned or realizations I’ve had on the product strategy and industrial design of the controller itself.
I’ll reserve some digital design and overall lessons for Part 3.
The controller was expensive (depending on what YOU designed)
As I stated earlier, existing, pre-made controllers from large companies like Korg were technically a much better value. The value of our proposed controller wasn’t necessarily the hardware itself, but the ability to customize the layout to suit your exact needs, as well as the experience of assembling the controller yourself. If you were looking for a box with 16 buttons, any number of controllers would be a better value.
Material choices could have been explored more.
Despite a higher price point and the value proposition of being “custom”, I don’t think the materials that ended up being used in the demonstration models represented that well. Musicians paying premium prices (even for DIY music products) have come to expect products with metal enclosures. ABS is a great, sturdy polymer, but it doesn’t exactly reflect exclusivity or personality, compared to say, wood or various alloys.

Yaeltex builds their premium controllers from premium materials.
Building around a circuit board made by a small company locked me in.
The LIVID Brain Jr. circuit board intended for all controller kits had limitations. the number of inputs restricted controllers to a combination of 16 buttons and 16 knobs or faders. It was also pricier than the kind of Atmel and ARM based Arduino boards that are typically associated with these projects.
I simply preferred the LIVID board because of the lack of programming needed. Ironically enough, the online controller config application has become completely deprecated by modern software protocol and has frozen many controllers in to their last configuration state.
Simply put, building around a cheap Arduino style board would have been a little more challenging up front, but would have been a better long-term solution.

The last version of the config running on a modern computer
Market trends in music hardware were already shifting from computer dependency to stand-alone instruments.
Looking back, it was probably too late to try to launch a new MIDI controller.
Music changes over time and so do the ways of making it and performing it. In the early 2010’s, many companies, such as Akai, and Native Instruments were very focused on creating hardware that acted as a tactile interface for a piece of software, with products like the APC and Maschine, respectively.
Other companies such as Korg, Behringer, and LIVID filled the gap by producing grids of knobs and buttons that user’s could map to their own needs, whether that be controlling software or even controlling other hardware.
Remember: a MIDI controller is not really a musical instrument. It only controls instruments.
I believe that the last 5 years has seen a shift in the hardware realm away from computer dependent MIDI controllers, and back towards analog synthesizers, drum machines, and standalone music making hardware (AKA "Grooveboxes").
I believe some of this has been driven by nostalgia, especially in popular music styles, revivals in electronic genres like Acid House and Lo-Fi (genres made before the advent of modern digital audio workstations) and may be further propelled by the immediacy of making something without a computer.
Perhaps those with the expendable income to afford gear are already sick of starring at a screen for their computer-based job, and an affordable way to return to 1980s technology is a necessary reprieve from perpetual interaction with software.
No laptop in sight, just vibes
After messing around with computer software and MIDI controllers for years, AKAI is once again offering completely self-contained versions of their MPC lineup (that people actually enjoy using), and Native Instruments recently launched the first stand-alone version of their very popular Maschine product.
Computer miniaturization has been a factor in the transformation of the old “Groovebox” in to something that can compete with a full digital audio workstation.
Korg has been dominating the entry-level market with its Volca line of analog synthesizers, drum machines, and samplers with built in sequencers, vintage sounds, and ease of use and connectivity. On the other end of the market, companies like Elektron embrace stand-alone music production instruments but won’t shy away from modern tech if it enhances the sound of the instrument.

Yea, and there’s this company too, almost forgot about them.
All of these examples represent (relatively) affordable ways of making music with out a computer and weren’t present back in the early and mid 2010’s when the seeds for this project were originally planted.
In hindsight, the controller should have been designed in a way to cooperate directly with instruments, with out the use of a computer. From a hardware standpoint, this could have been the inclusion of DIN MIDI jacks to connect directly to synthesizers and drum machines.

The much bigger and more expensive LIVID Brain V2 had the DIN jacks.
What happened to LIVID?
At the time, LIVID was a leader in highly functional MIDI controllers, and the only makers of purpose-built microcontroller circuit boards intended specifically for MIDI control. However, by the time this project made it to my portfolio in late 2015, things started to change at LIVID.
As far as what I can gather using the Wayback Machine, LIVID stopped selling the Brain Jr. circuit board in the summer of 2016. By 2019, links to the LIVID store were off limits to non-admin users. Today the LIVID shop is a broken link.
So what happened to LIVID? Maybe if I had been more active on twitter at the time, I would have known that one of their founders, Jay Smith, was diagnosed with ALS in 2014. Jay is very much still fighting the good fight with Every 90 Minutes, the organization he founded with others to raise money for promising ALS research, and to provide resources and for other individuals living with this disease.
Jay’s story of daily perseverance is really incredible and I highly recommend you follow him on twitter if you want to learn more.
Part 3
In Part 3, I plan on going through the process of designing the “controller designer” and the rest of the kit including instructions, packaging, and marketing materials, as well as my experience flirting with entrepreneurship, the emergence of a would-be competitor, and what’s next for this now 7 year old project.

KeyShot tended to produce some cool glitch art